You know that feeling when your axe slices through wood like it’s cutting through warm butter?
That’s the magic of a perfectly sharpened blade.
But let’s face it -over time, even the finest axes lose their edge. And if you’re not careful, improper sharpening can turn your prized Gransfors Bruks into a sad, chipped, and uneven mess (and suddenly your axe feels more like a headache than a help).
But don’t worry -keeping your axe razor-sharp without damaging it doesn’t have to be rocket science. With the right techniques, the right tools (some are essential, others you can totally skip), and a little know-how, you can avoid the common pitfalls that trip up most people.
In this guide, we’ll walk you through everything you need to know -step by step.
Whether you’re a first-time axe owner or a seasoned outdoorsman looking to up your sharpening game, we’ve got you covered. By the end, you’ll have a foolproof routine that keeps your Gransfors Bruks in top-notch shape for years.
So, let’s dive right into the serious stuff.
If you’d ask any axe enthusiast, they’d tell you that a dull axe is far more dangerous than a sharp one. Because it forces you to use more force which means less control, and that’s a fast track to accidents.
But tell you what, most people don’t actually know how to sharpen their axe properly. They often use the wrong sharpening angle or put too much pressure. Putting too much pressure or the wrong angle can mess up your blade big time -creating an uneven edge, stripping away more metal than necessary, and even weakening the blade over time.
Sharpening doesn’t have to be complicated.
The key is to keep a steady hand, stick to the original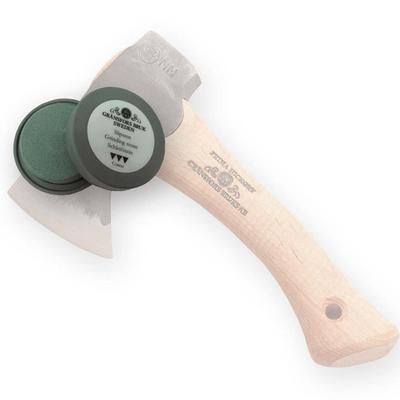 bevel angle (usually around 25–30 degrees for Gransfors Bruks axes), and let the sharpening tool do the work. Get this step right and you’re already ahead of most axe owners.
PRO TIP: Always sharpen away from the edge, not toward it. Sharpening toward the edge can create micro-fractures in the blade, weakening it over time. By sharpening away from the edge, you’re removing material evenly and preserving the integrity of the blade. It’s a small detail, but it makes a world of difference.
Walk into any hardware store, and you’ll feel LITERALLY like a kid in a candy store -except instead of candy -it’s a wall of sharpening tools. Files, stones, grinders, honing guides…it’s enough to make your head spin.
But you don’t need half of that stuff. Seriously.
When it comes to your Gransfors Bruks axe, sharpening is pretty simple. These axes are hand-forged with premium steel, so they don’t need aggressive tools or fancy gadgets. Here’s a quick checklist for you to see what you ACTUALLY need, and what you can totally skip:
A ceramic sharpening stone: This is your MVP for regular maintenance. It’s gentle on the blade but tough enough to keep it razor-sharp. (And did you know, Gransfors Bruks makes a ceramic stone specifically for their axes, and it’s an absolute game-changer!)
A sharpening file: If your axe is looking a little worse for wear (got some dull edges or small chips) a file helps you reshape the edge before finishing with the stone.
A leather strop (optional but amazing): It’s cherry on top. Stropping polishes the edge, smooths out microscopic burrs, and makes your axe glide through wood like butter. It’s not essential, but it’s one of those “once you try it, you’ll never go back” things.
Power grinders: These are like using a flamethrower to light a candle -way too aggressive. They can overheat the steel and ruin the temper of your blade.
Cheap sharpening gadgets: You know the ones. They promise instant results but usually leave you with a wonky edge and a headache.
Anything that claims to “sharpen instantly”: If it sounds too good to be true, it probably is. Sharpening is a skill, not magic.
Stick with the essentials, and you’ll be sharpening like a pro in no time.
Sharpening your Gransfors Bruks axe might sound intimidating at first, but it’s actually way easier than you think. With the right technique, you can keep your axe razor-sharp with minimal effort -just follow this simple step-by-step process, and your axe will always be ready for whatever you throw at it:
First things first -make sure your axe is placed in a stable position, either clamped down or held firmly against a surface. A wobbly axe isn’t just annoying…it makes sharpening inconsistent and, let’s be honest, a little risky for your fingers too. So, Safety first, guys.
Grab your ceramic sharpening stone (this one from Gransfors Bruks is a perfect match, by the way) and get to work. Using a circular motion, gently glide the stone along the edge, following the natural curve of the blade. Keep the pressure light and even, and make sure to sharpen both sides equally. This helps maintain a consistent bevel and keeps your axe cutting smooth.
After a few passes, it’s time for the thumb test. Lightly run your thumb across the edge (carefully, of course -no slicing allowed!). If it feels smooth and sharp, you’re golden. If not, no worries -just keep going with steady, controlled strokes. Patience is key here.
Want to take your sharpening game to the next level? Grab a leather strop. This little guy removes tiny burrs and polishes the edge to a razor-sharp finish. It’s not a must, but if you’re all about that next-level sharpness, you’ll love the results.
PRO TIP: Sharpen little and often. A few quick strokes with the ceramic stone after each use will keep your axe in peak condition and save you from heavy grinding down the road.
So, let’s say you’re out in the woods, swinging away, and clang! -your Gransfors Bruks axe just met a rock or nail. Suddenly, that once-perfect edge has a chip or dent now, and your heart sinks a little.
But don’t panic. Your axe isn’t ruined.
With a little TLC, you can bring it back to life and get back to chopping like a pro. Here’s how the expert say you can manage it:
First, take a deep breath and inspect the damage. Is it a small nick? This will be a quick fix. A deep gouge? No worries, it’ll just take a little more elbow grease. Either way, your axe isn’t done for.
For serious damage, grab a sharpening file (this one from Gransfors Bruks is perfect for the job). Use long, even strokes, following the original bevel of the blade. Work slowly and carefully -removing too much metal can shorten the life of your axe, so take your time.
Once the major damage is filed down, switch to a diamond file to refine the edge. This step helps restore a sharp, even bevel and gets your axe ready for the final polish.
Now, grab your ceramic sharpening stone for the finishing touches. Use gentle, circular motions on both sides of the blade until the edge feels smooth and sharp again. This step will leave your axe feeling brand new.
If you’ve got a leather strop, give your edge a few final passes to polish it up. Then, wipe down your axe head and apply a thin coat of oil to protect it from rust.
Whether you’re avoiding the #1 sharpening mistake, using the best tools for the job, or repairing unexpected damage, a little care goes a long way. And if you need quality sharpening tools or even a brand-new axe to add to your collection, we’ve got your back.
Explore our full range of Gransfors Bruks axes and sharpeners here.
Copyright @ 2024 Piragis Northwoods Company and Boundary Waters Catalog

 Canoe Trips
 Canoe Trips